Last reviewed October 29, 2026 · Dr. Ilseop Ahn (board-certified periodontist and specialist in integrated dentistry), with assessment by Dr. Sunmin Kim (board-certified orthodontist)
At a glance
Good for
Front teeth that are small, have gaps, or sit slightly inward, leaving room to add
Treatment flow
Check tooth positions → check the added thickness in 3D → decide on no-prep or minimal prep
Duration and limits
Front teeth that stick out or are very dark are difficult with no-prep veneers
Details
No-prep veneers add a very thin layer of ceramic, about 0.2–0.5 mm, on top of the tooth without shaping it. They look natural when there is room to add to the tooth: for example, when front teeth are small, have gaps between them, sit slightly inward, or have worn down and become shorter at the edges. If front teeth stick out, overlap, or are very dark, no-prep veneers can look bulky or fail to hide the color. At Ceramic Dental Clinic, a board-certified orthodontist first checks where your teeth are and also looks for teeth that could be done without reduction after a small movement.
01°
Cases where no-prep was right, where only some teeth were shaped, and where teeth were moved first
It is common for one person to have both no-prep and minimal-prep teeth. These real cases show how we decided for each tooth.
CASE01
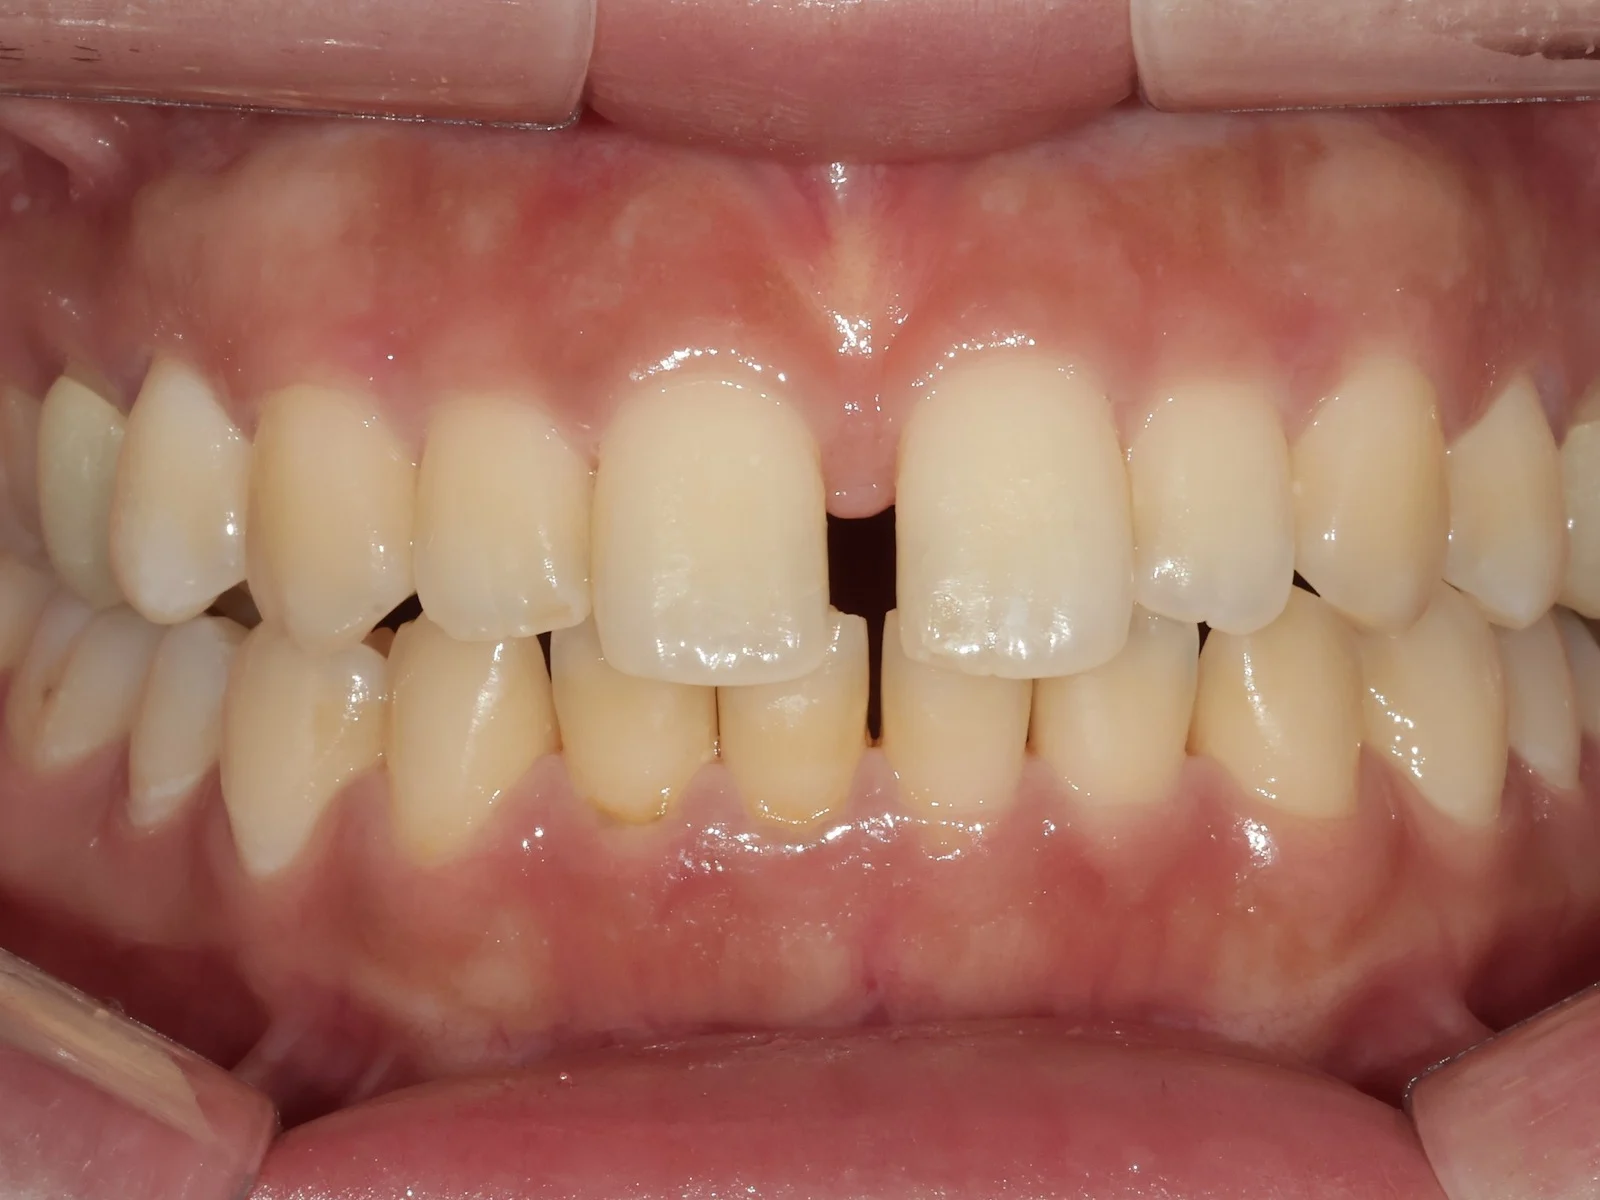
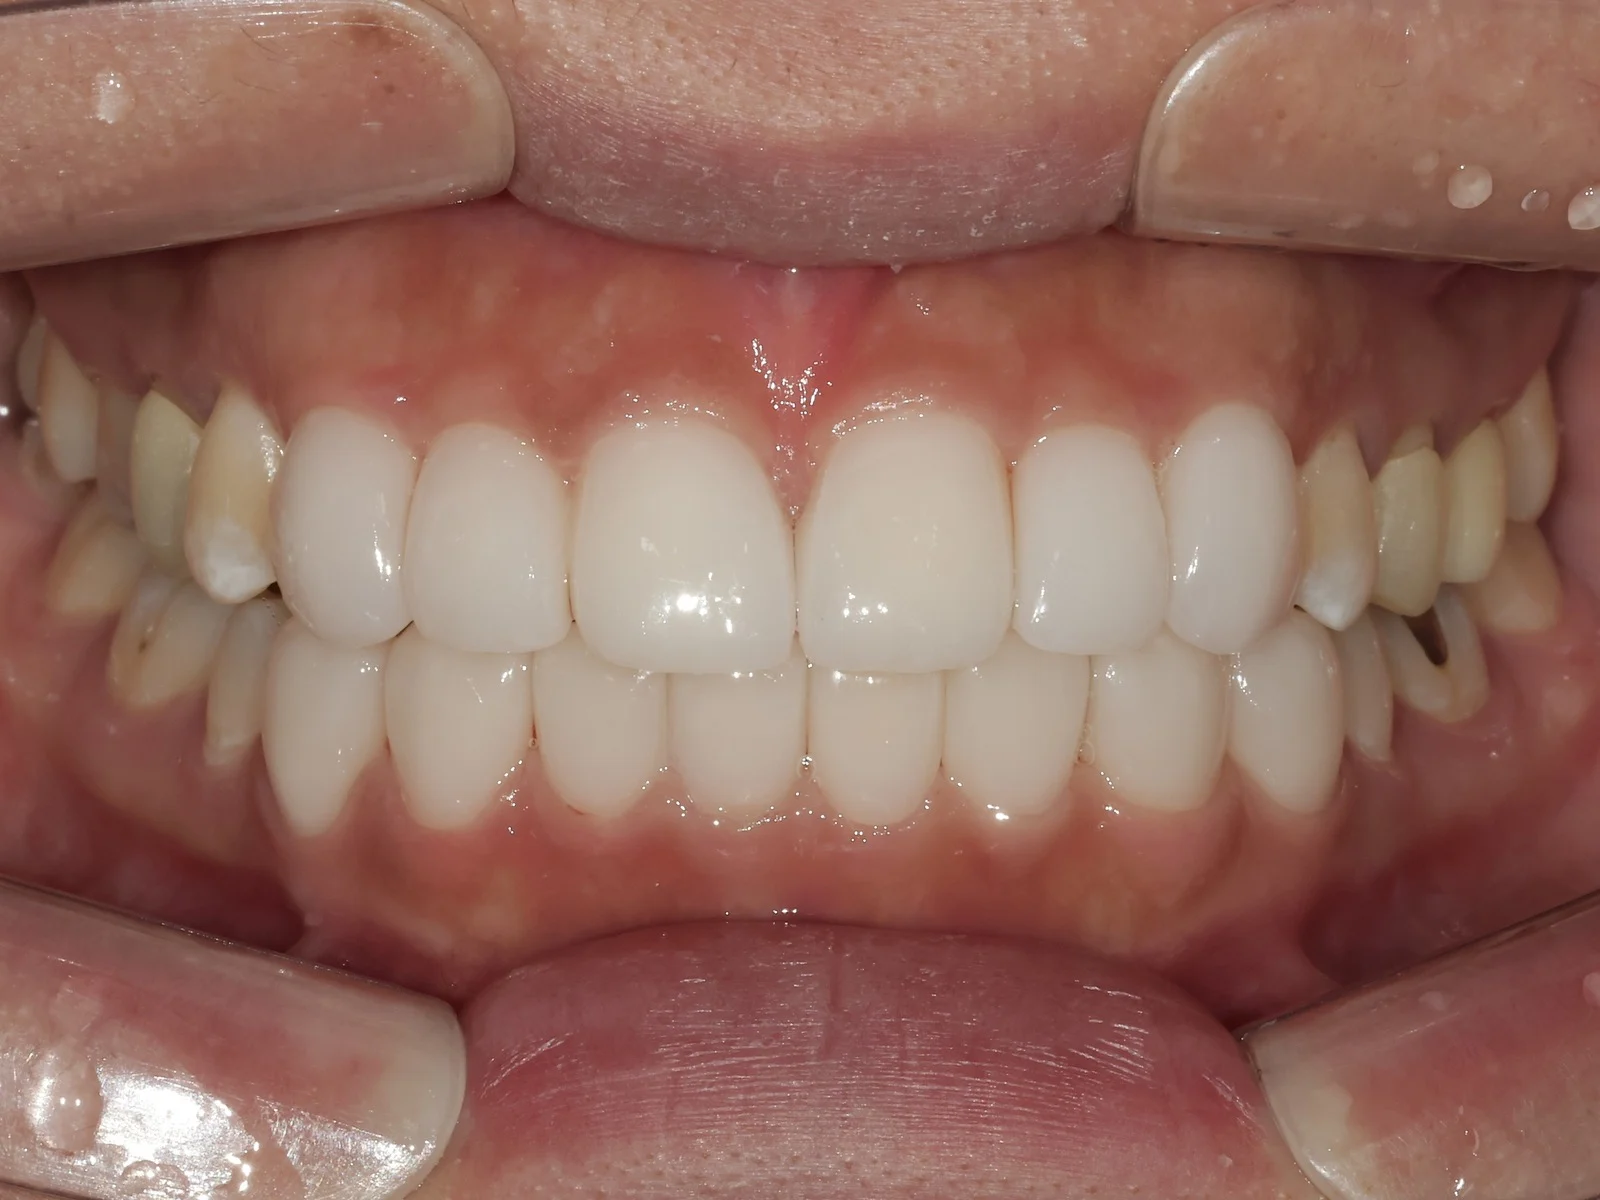
A 2.7 mm gap between the front teeth
14 CERANATE veneers · The gap was shared across several teeth and closed with no-prep and minimal-prep veneers
Before · Feb 2026
Before treatment, front view inside the mouth. The gap between the upper central front teeth was about 2.7 mm, leaving plenty of room to add to the teeth.
After · Mar 2026
After treatment, front view inside the mouth. Instead of closing the gap with only the two central front teeth, we shared it across the neighboring teeth, so each front tooth kept a natural width.
Condition
A gap of about 2.7 mm between the upper central front teeth, two slightly long front teeth, upper and lower midlines not aligned, small gaps between the lower front teeth (woman in her 20s)
Chosen
CERANATE: 6 upper and 8 lower, gap shared across teeth, length adjusted, color matched
Reduction
No prep or minimal prep, decided tooth by tooth
Not done
Orthodontics lasting over 1 year (the bite and alignment had no major problems)
Duration
Usually about 1 week from preparation to bonding, 2 visits
CASE02
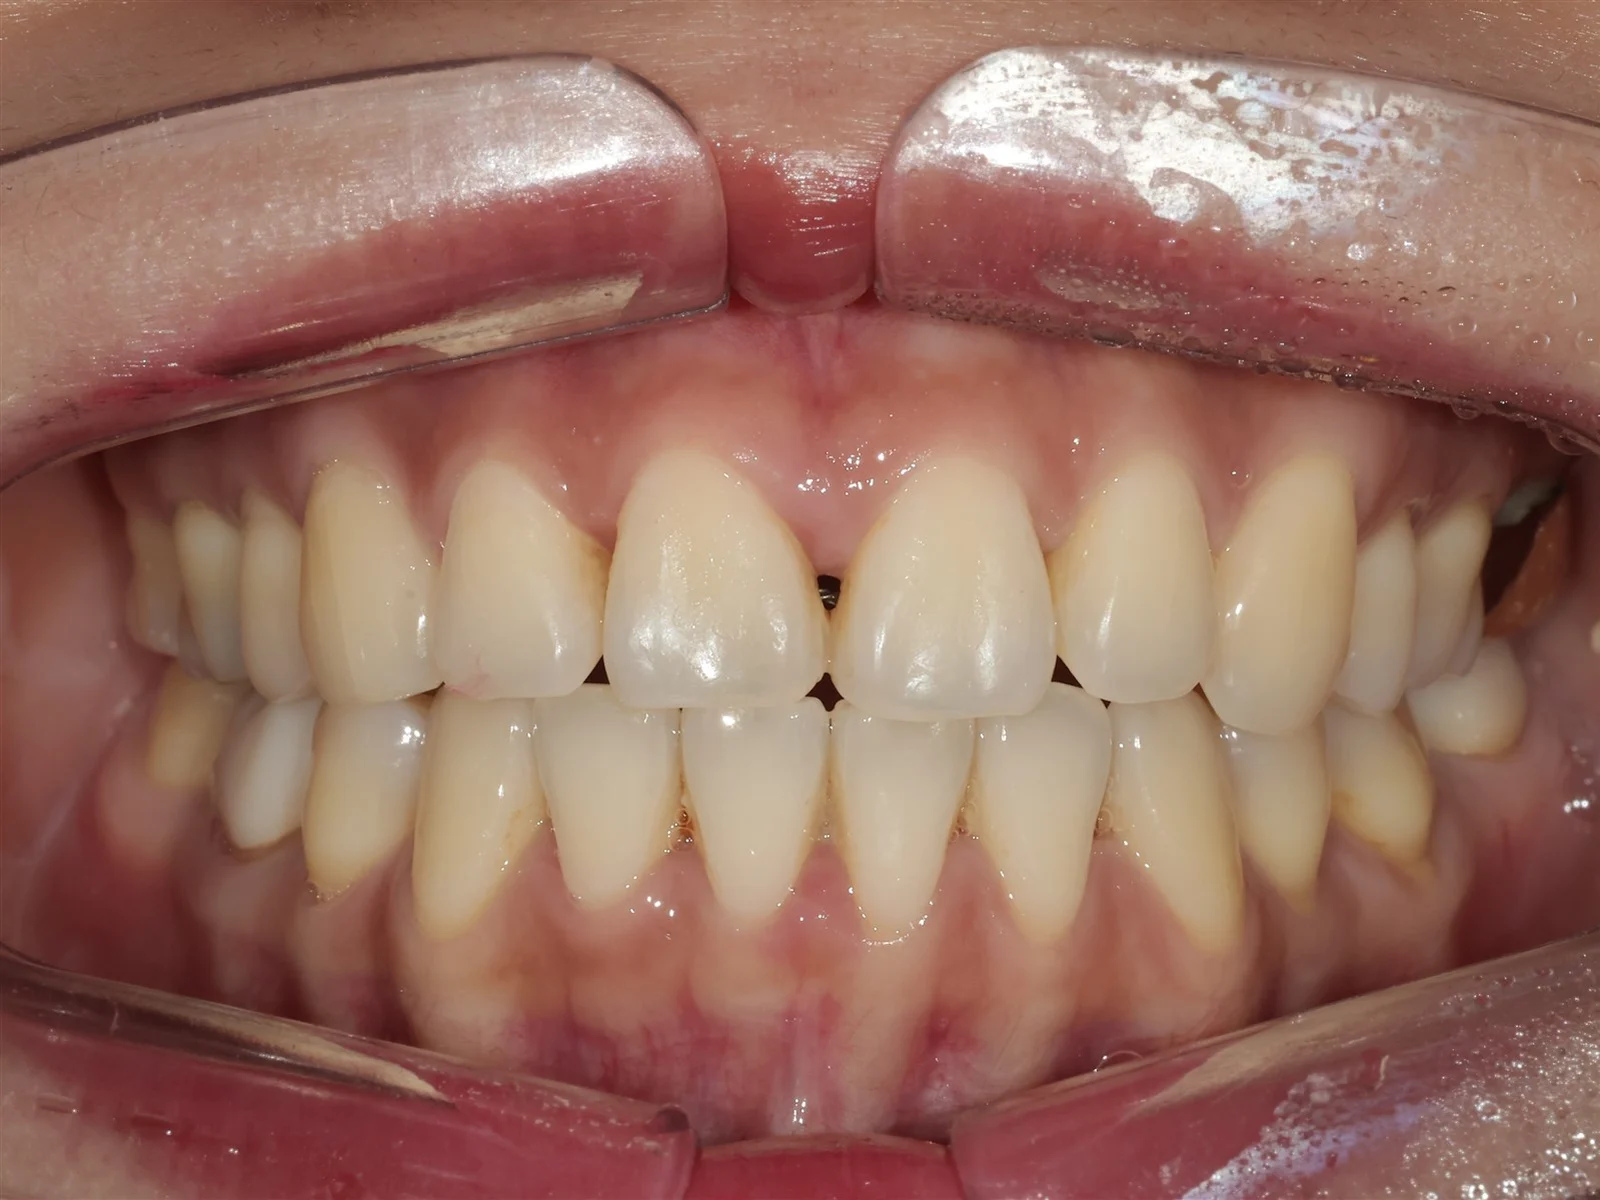
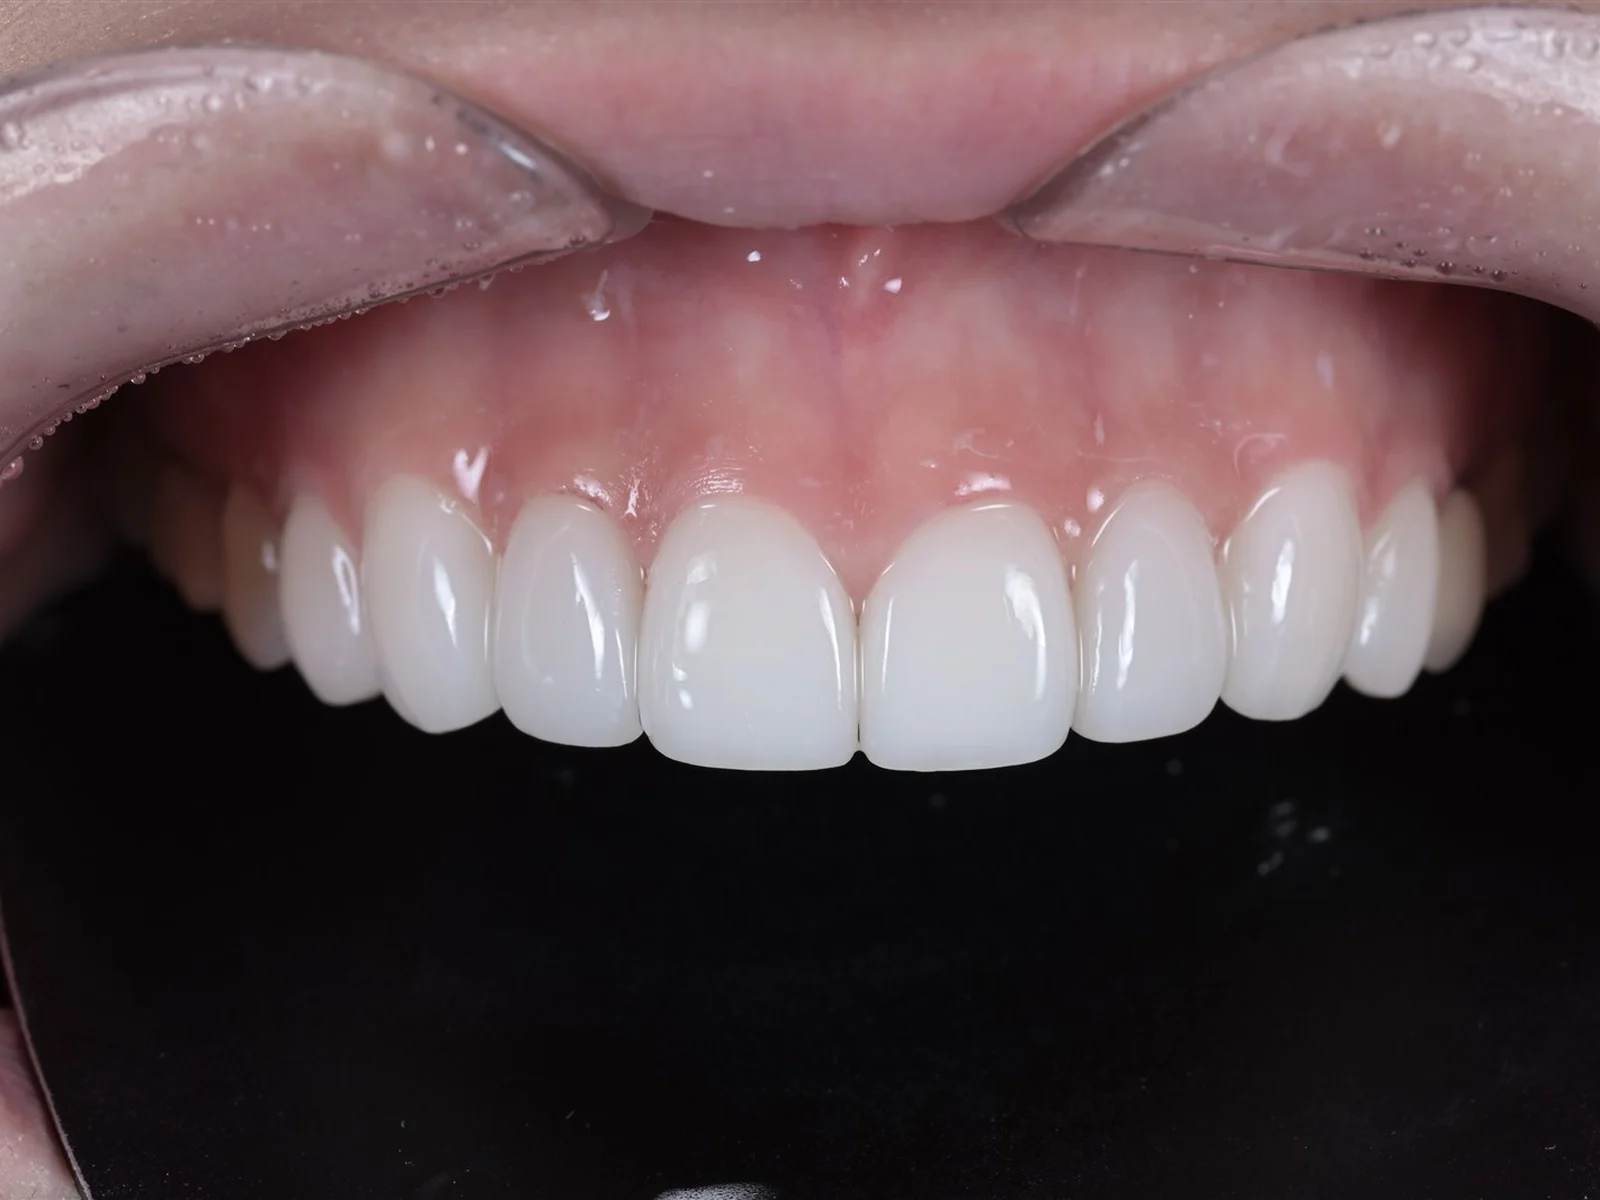
Most teeth were barely shaped, and just one tooth was shaped more
8 upper CERANATE veneers · 5 at 0.2 mm or less without anesthesia, only 1 canine about 0.7 mm
Before · May 2026
Before treatment. The front teeth were short and wide with a dark gap in the middle, and the right canine was worn and shorter than the left.
2-week check-up after treatment · May 2026
After treatment. Teeth that needed added length were barely shaped. Only the left canine, which sat outside the desired shape, was shaped more to even out the length of the left and right canines.
Condition
Black triangles remaining after 2 rounds of orthodontics, short and wide front teeth, a bite where the front teeth do not touch, and a length difference between the left and right canines (woman in her 30s)
Chosen
8 upper CERANATE veneers (#14–#24, IPS e.max)
Reduction
5 at 0.2 mm or less without anesthesia, left canine about 0.7 mm with local anesthesia
Duration
Prepared on the day of consultation, bonded the next day (2 visits over 2 days)
CASE03
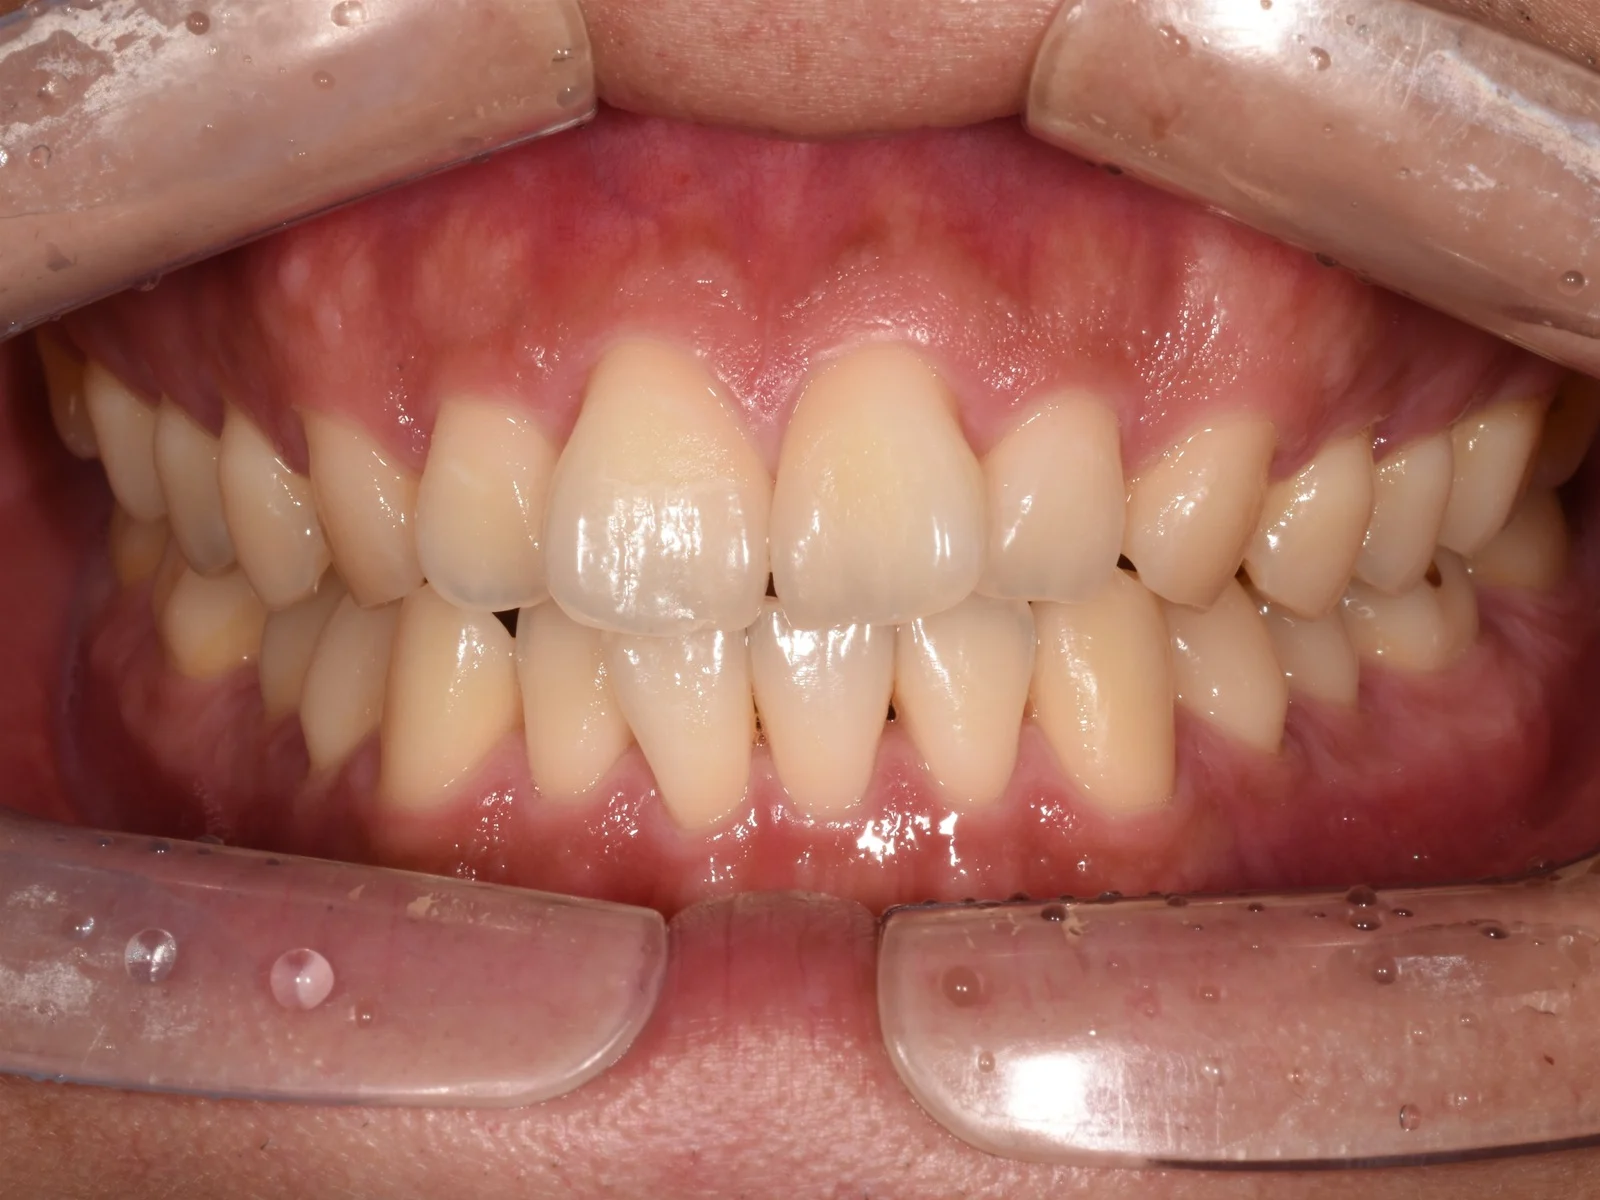
Wanted no-prep veneers, but the front teeth stuck out
Front-teeth partial orthodontics first, then no-prep veneers
Before orthodontics · Apr 2025
Before orthodontics, front view inside the mouth. The two upper central front teeth stood out more than the neighboring teeth, and the lower front teeth were unevenly aligned.
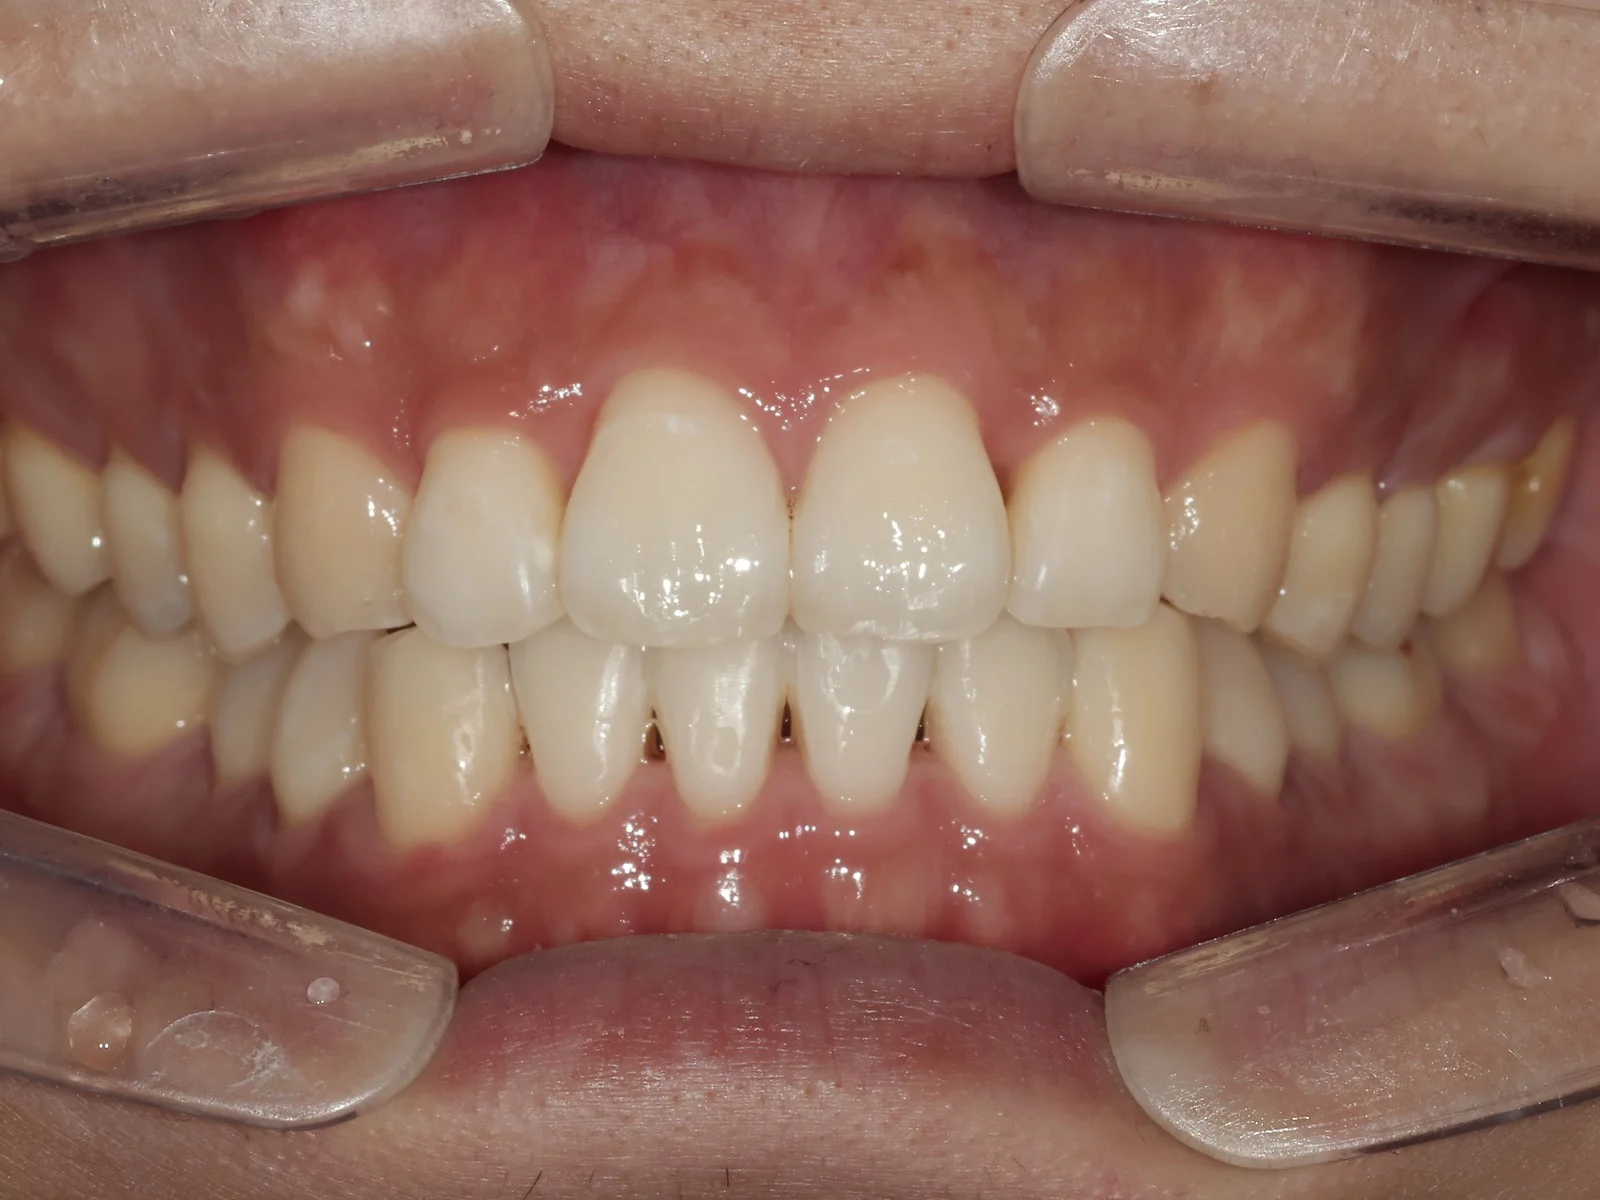
After orthodontics, before veneers · Apr 2026
After partial orthodontics, before veneers. We first moved the front teeth into an even line to create room to add ceramic.
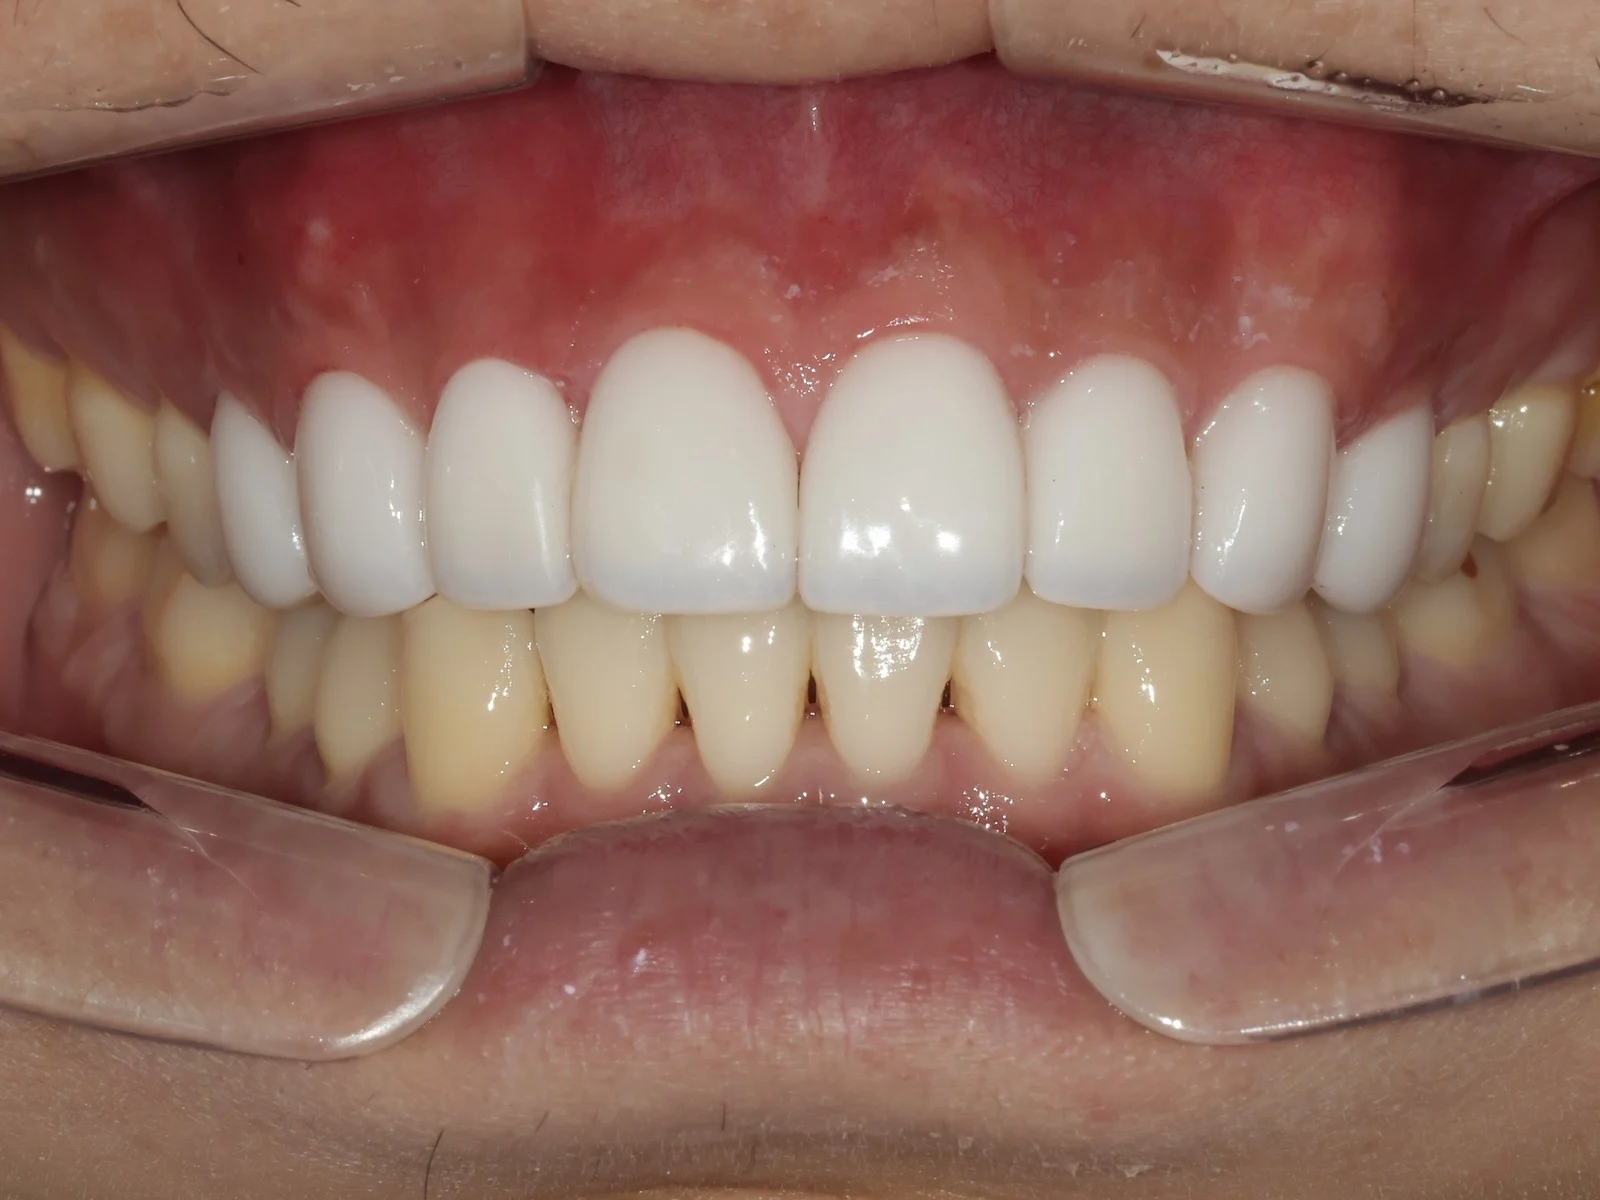
After veneers · Apr 2026
After veneers. Veneers were bonded from an upper premolar to the premolar on the other side to match color and shape.
Condition
The two upper central front teeth stood out, and the lower front teeth were unevenly aligned
Chosen
No-prep veneers after front-teeth partial orthodontics, 8 upper (premolar to premolar)
Not done
Reduction to hide teeth that stuck out
Duration
6 months of partial orthodontics, CERANATE bonded about 2 months after orthodontics ended
* Photos were taken under the same conditions and published with the patients' consent. Treatment results and side effects may vary from person to person.
02°
Which teeth can have no-prep veneers? It depends on whether there is room to add
No-prep veneers add a thin layer to the tooth, so they look natural only on teeth with room to add to. This judgment, more than the material, determines the result.
01Teeth that can often have no-prep veneers
Small front teeth (microdontia), gaps between teeth, front teeth that sit slightly inward, front teeth worn down and shortened at the edges, and teeth that are only slightly yellow. The finished shape sits outside the current tooth, so there is nothing to reduce.
02Teeth that are difficult for no-prep veneers
Adding to front teeth that stick out makes them look even more forward, and overlapping front teeth need the overlapping parts shaped. Very dark color is hard to hide with thin ceramic, and teeth with large resin fillings or cavities need to be treated first.
03Teeth that can become no-prep after moving
Even overlapping or protruding teeth can, in some cases, switch to no-prep or minimal-prep veneers once they are aligned with front-teeth partial orthodontics. Front-teeth partial orthodontics usually takes 4–6 months.
04Teeth affected by bite and habits
If the upper and lower front teeth hit hard, or if teeth grinding or clenching is severe, thin ceramic chips easily. We adjust the bite first or also consider a guard worn at night.
Even with no-prep veneers, a very small adjustment to smooth the bonding surface may be needed. If so, we will tell you in advance.
03°
How we decide on no-prep veneers
Five steps to decide, for each tooth, whether it is no-prep, minimal prep, or orthodontics first.
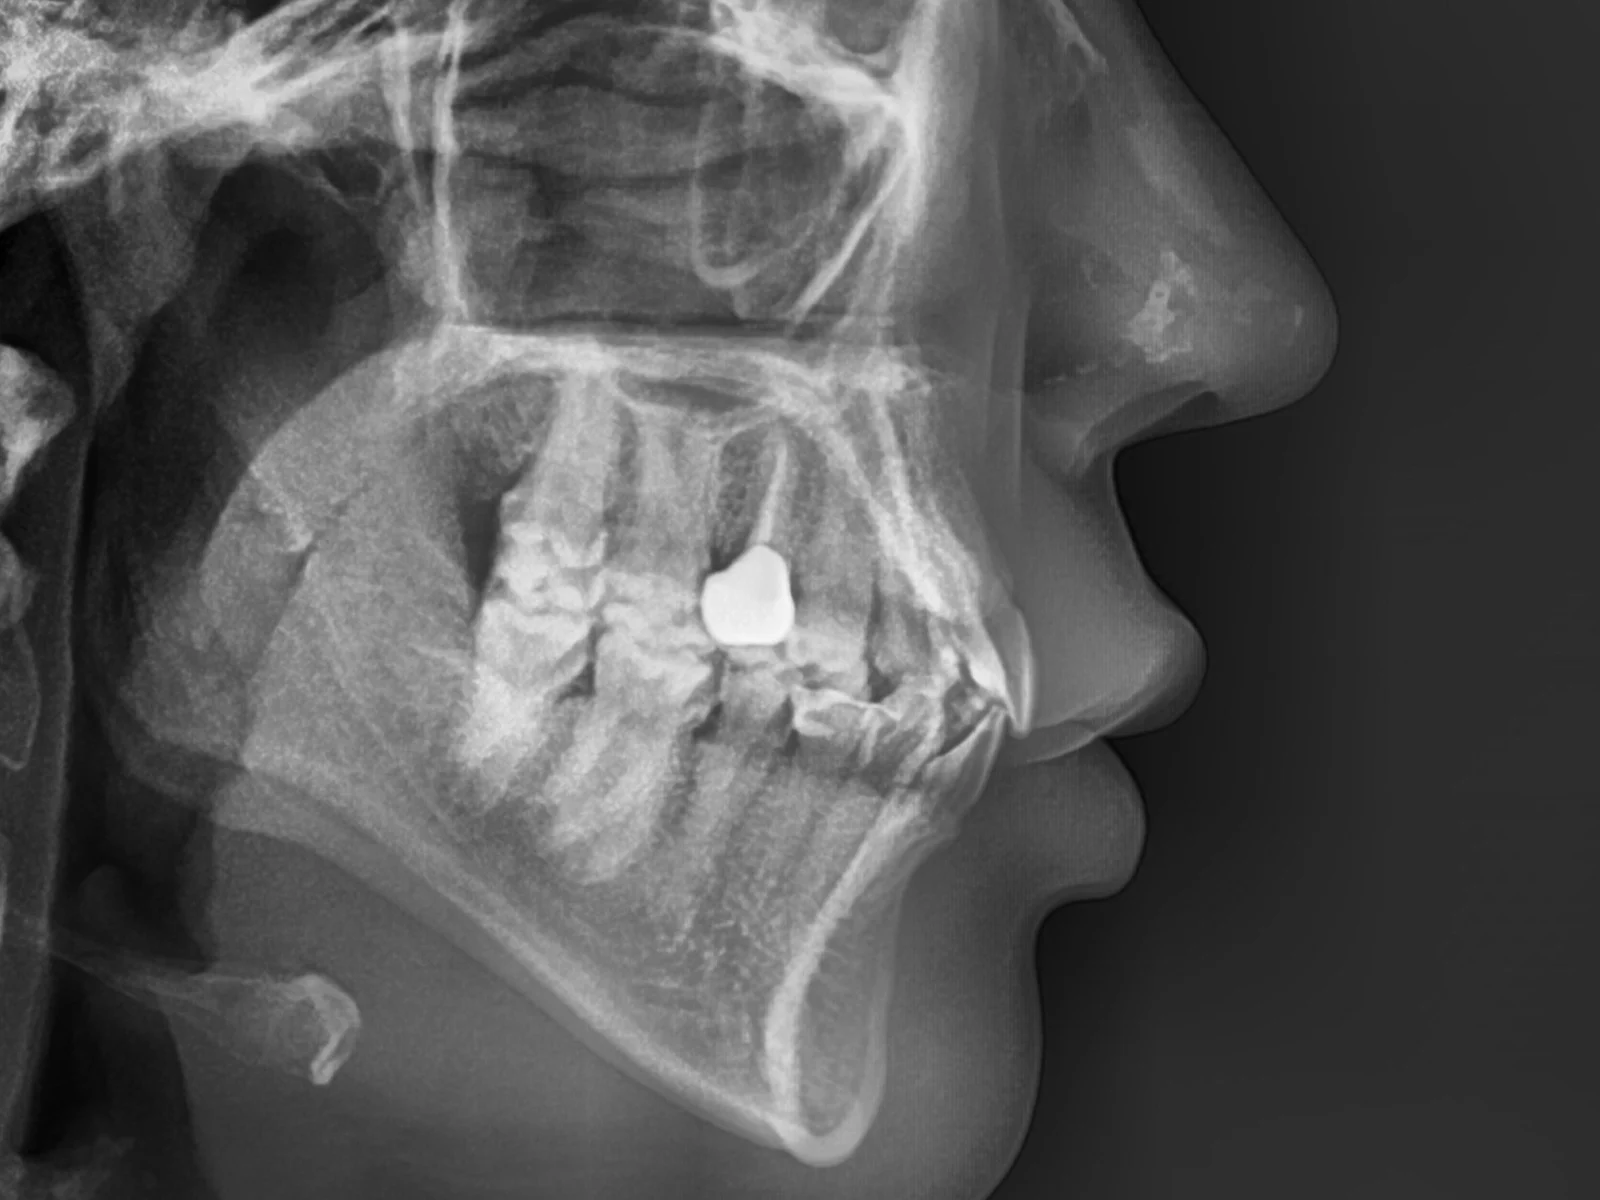
Cephalogram
Position check by the orthodontist. We see whether the front teeth stick out and how many mm they overlap.
STEP 01
Our orthodontist first checks whether teeth stick out
Dr. Sunmin Kim (board-certified orthodontist) checks whether the front teeth stick out toward the lips, how many mm they overlap, and whether moving them would create room to add.
Why we do thisBonding veneers directly onto teeth that stick out makes the mouth look that much more forward. Whether no-prep is possible is decided first by tooth position, not by the material.
Gum line
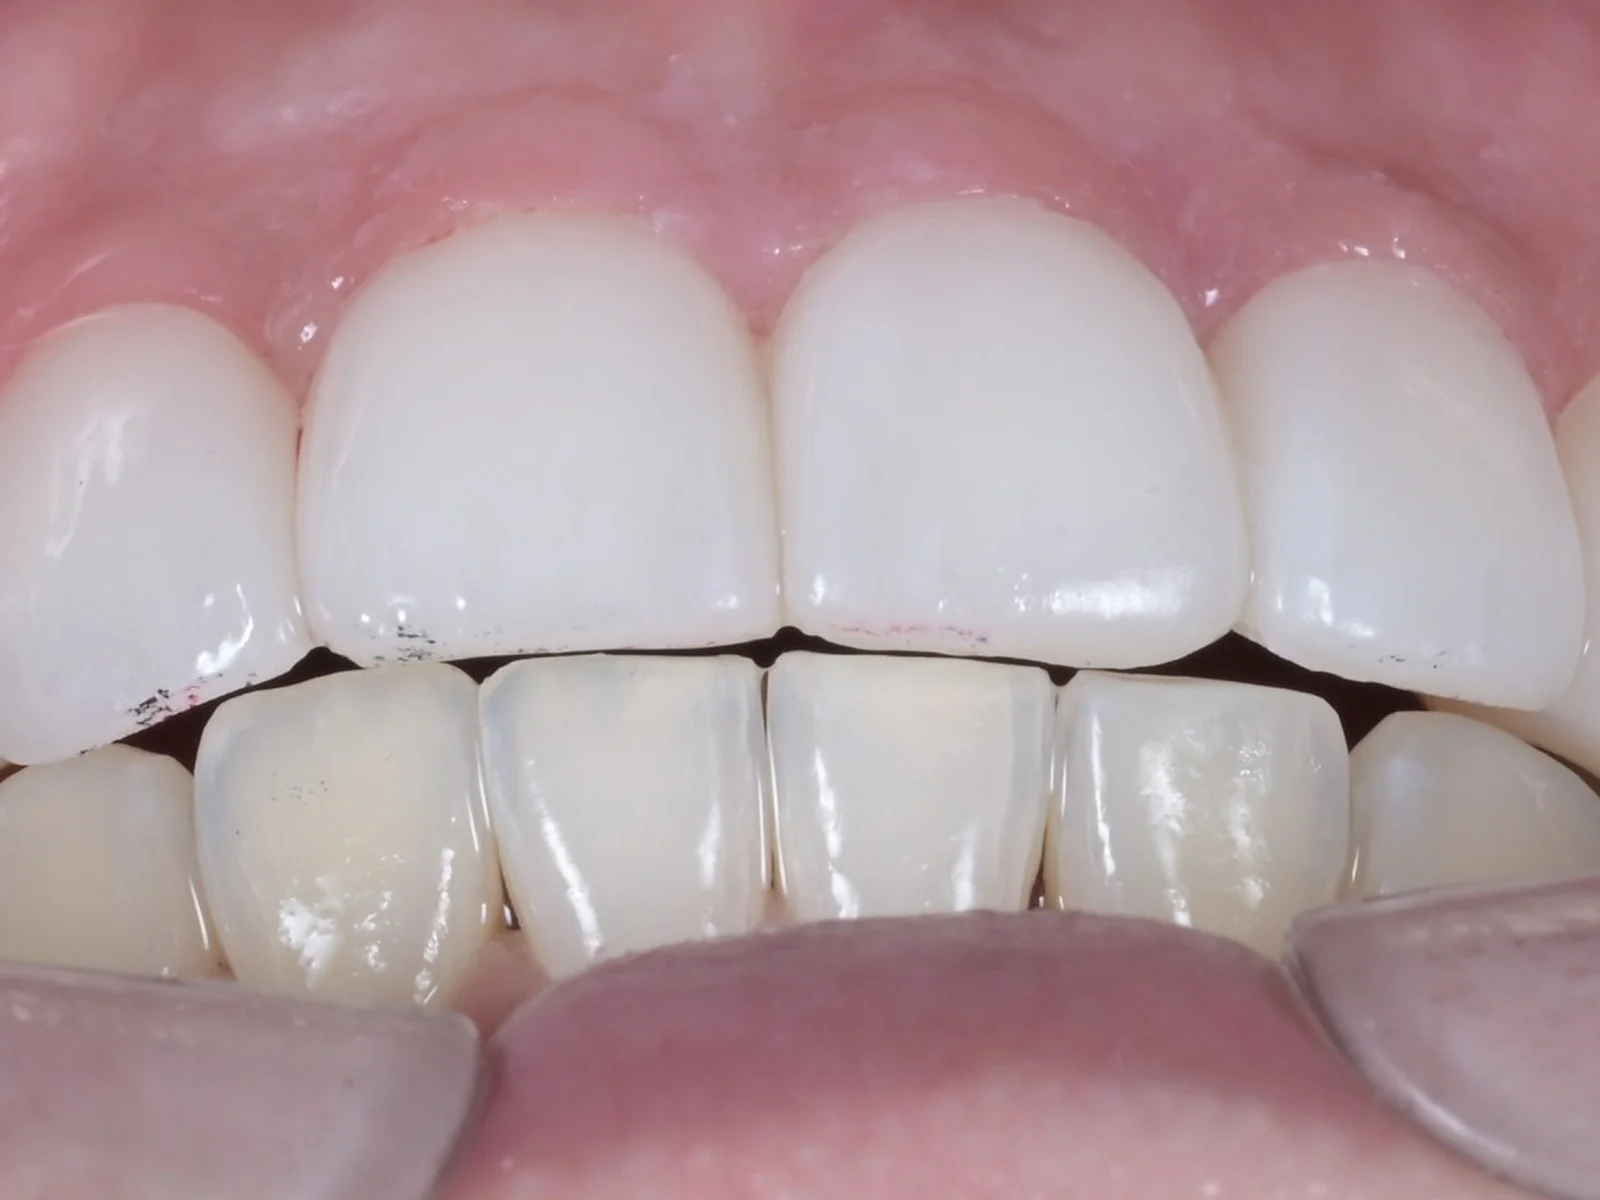
Gum line check by the periodontist. We look at how the edge of the added ceramic meets the gums and how thick the gums are.
STEP 02
We check that the edge near the gums does not become bulky
No-prep veneers add ceramic without reducing the tooth, so a ledge can easily form at the edge near the gums. We look at gum thickness and inflammation to confirm that the edge can be finished thin.
Why we do thisIf a ledge remains at the edge, plaque can build up beneath it and cause gum inflammation, and the edge may stain or the gums may look red.
Front thickness
Side view
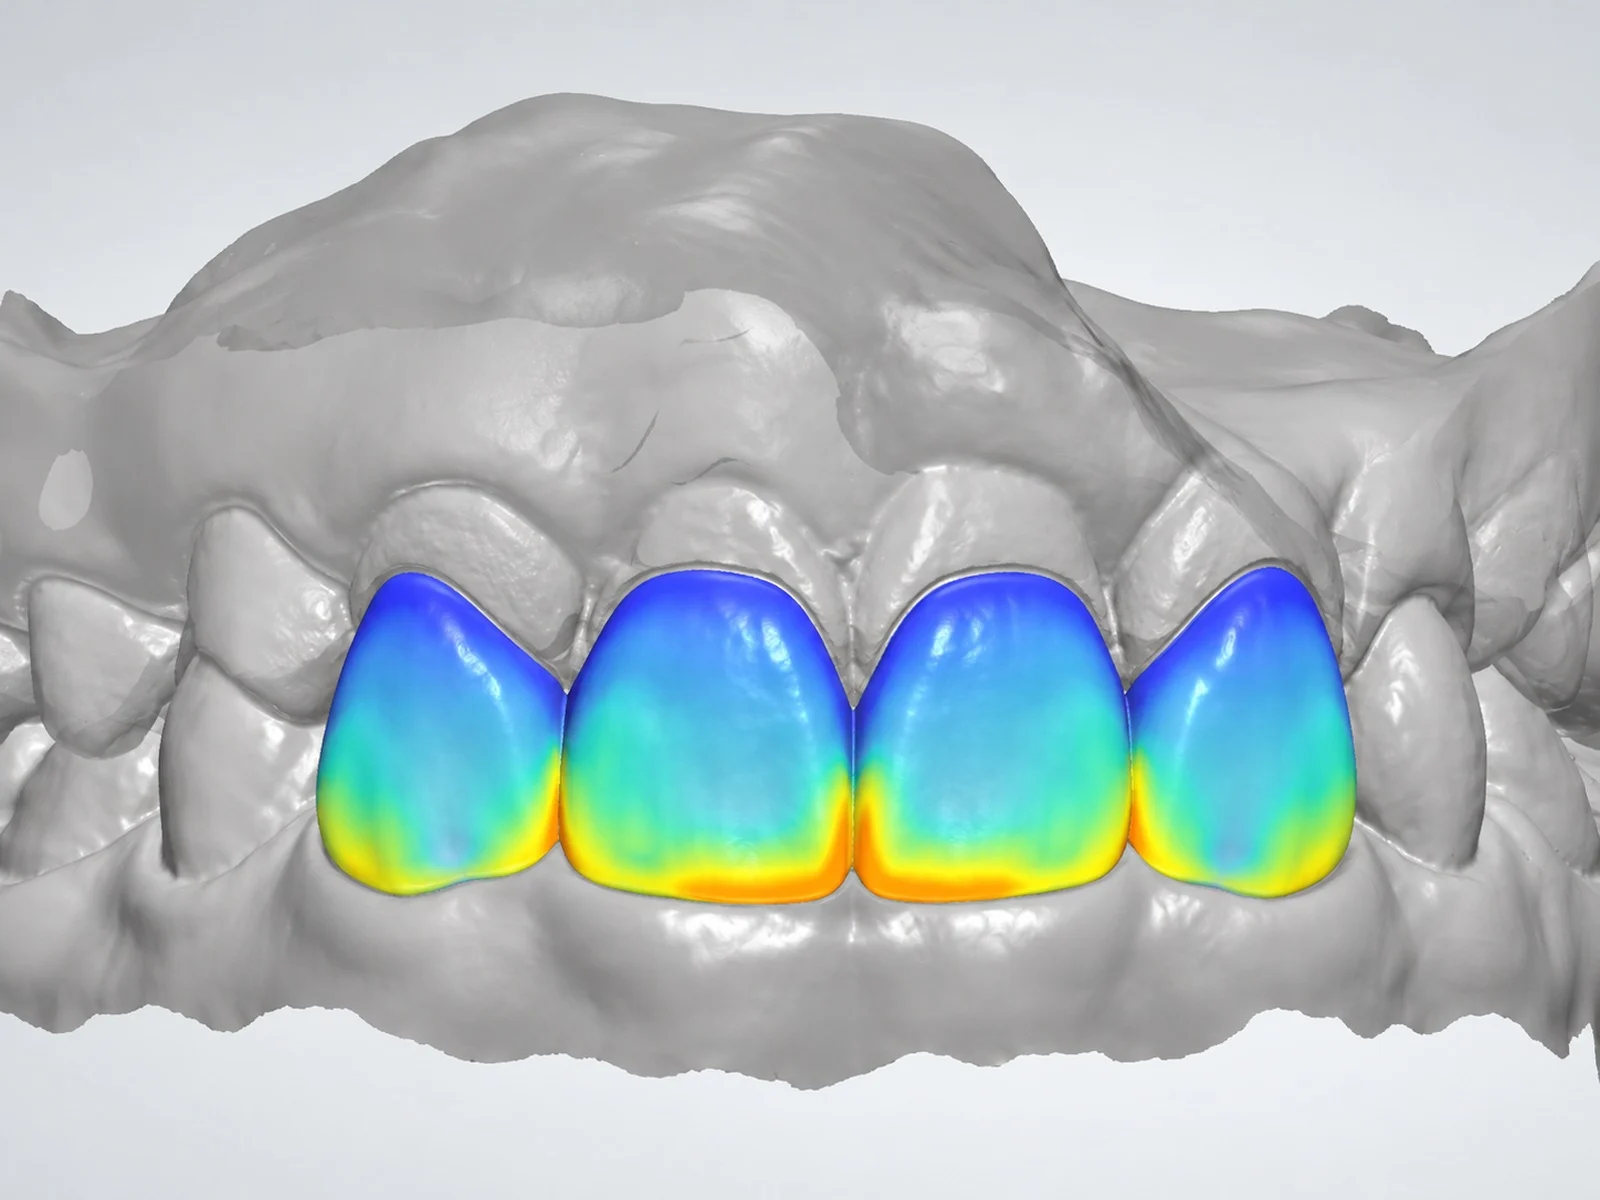
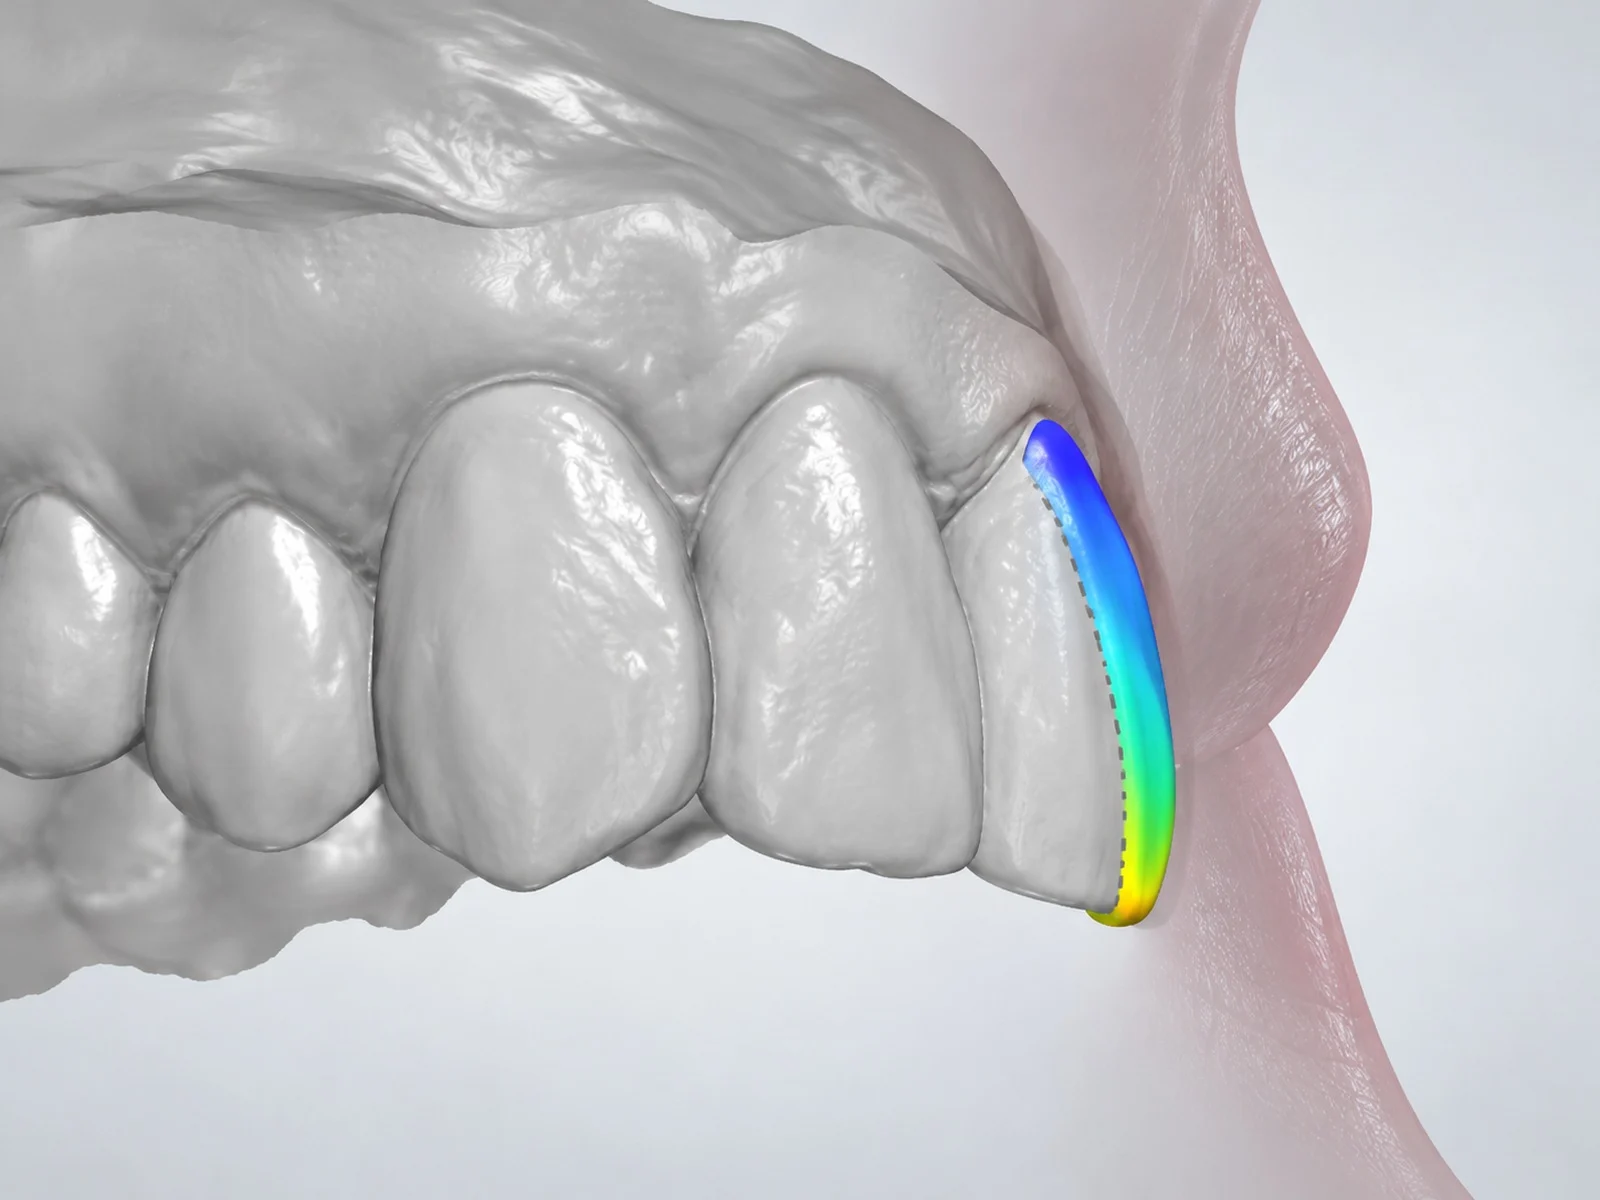
Example of a 3D design screen. We overlay the finished shape on your current teeth to preview the added thickness and check that the teeth do not look bulky from the side. Blue marks thinner additions and yellow marks thicker ones.
STEP 03
We calculate the added thickness in advance in 3D
We overlay the finished shape on a digital model made from an iTero intraoral scan and calculate how many mm of ceramic will be added to each tooth. We check not only the front view but also whether the front teeth look bulky from the side.
Why we do thisWhere the finished shape lies outside the current tooth, no reduction is needed. Only teeth with parts that must sit further in need those parts shaped, so the answer differs from tooth to tooth.
① Shade comparison
② Show-through check
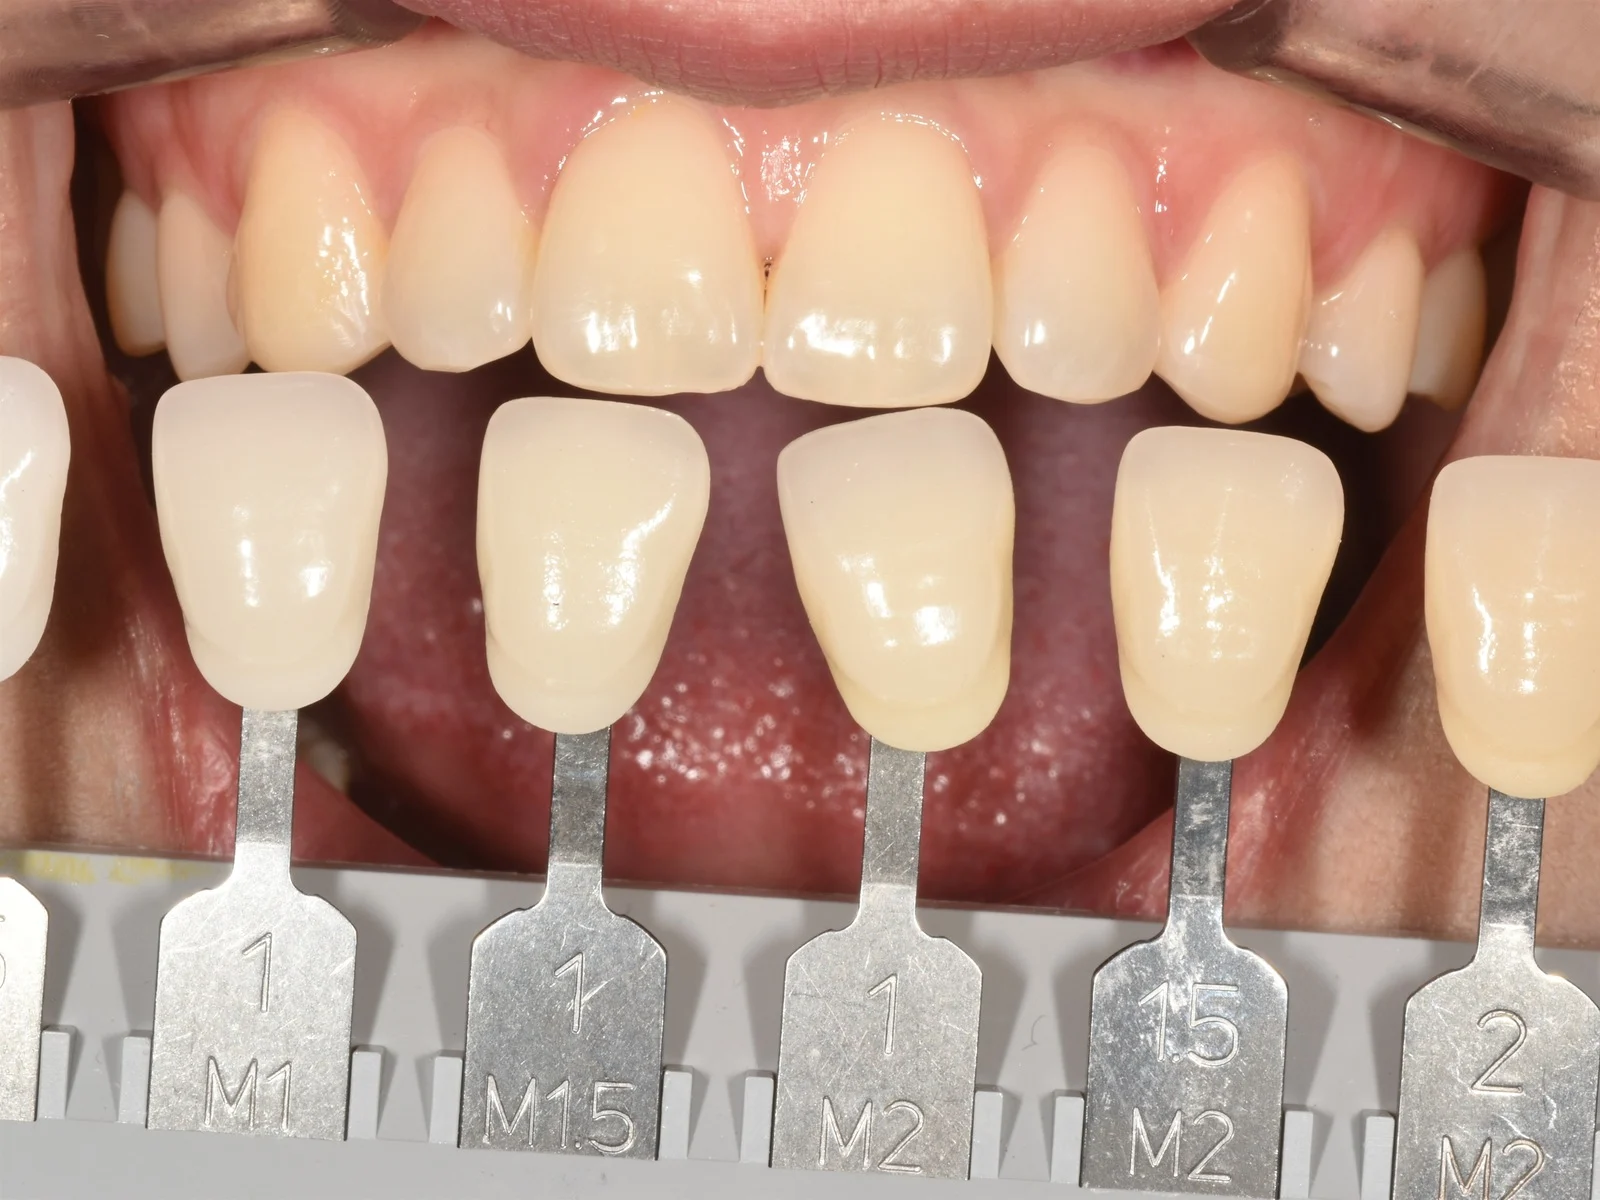
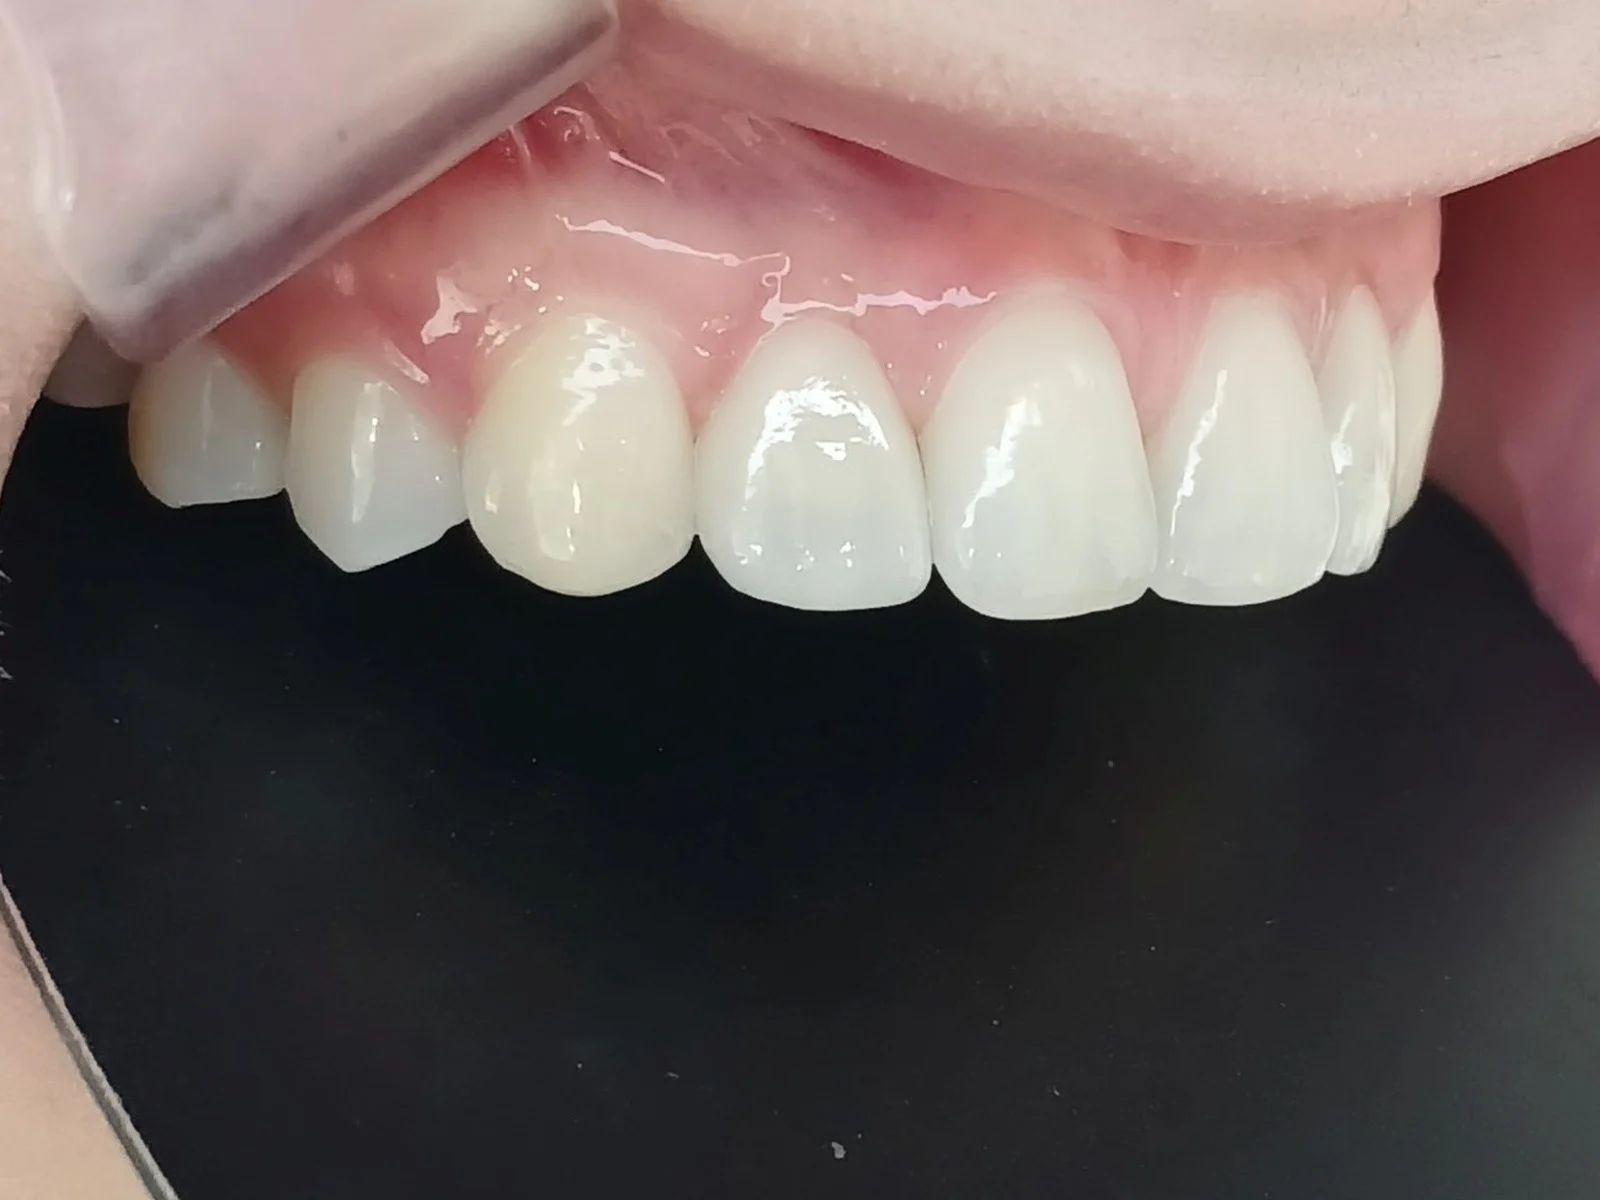
Checking color show-through. We hold samples of several shades in the mouth to compare them and see directly how much of the original tooth color shows through the thin ceramic. Both photos are of the same patient.
STEP 04
We check how much of your original tooth color shows through
No-prep ceramic is thin, so the color of the tooth underneath shows through. We try 6 shades in the mouth, including the color of the bonding material, to confirm that you get the brightness you want.
Why we do thisIf the tooth underneath is dark, thin ceramic alone cannot give the brightness you want. In that case, we whiten first or make room for thickness with minimal prep on some teeth only.
Decision for each tooth
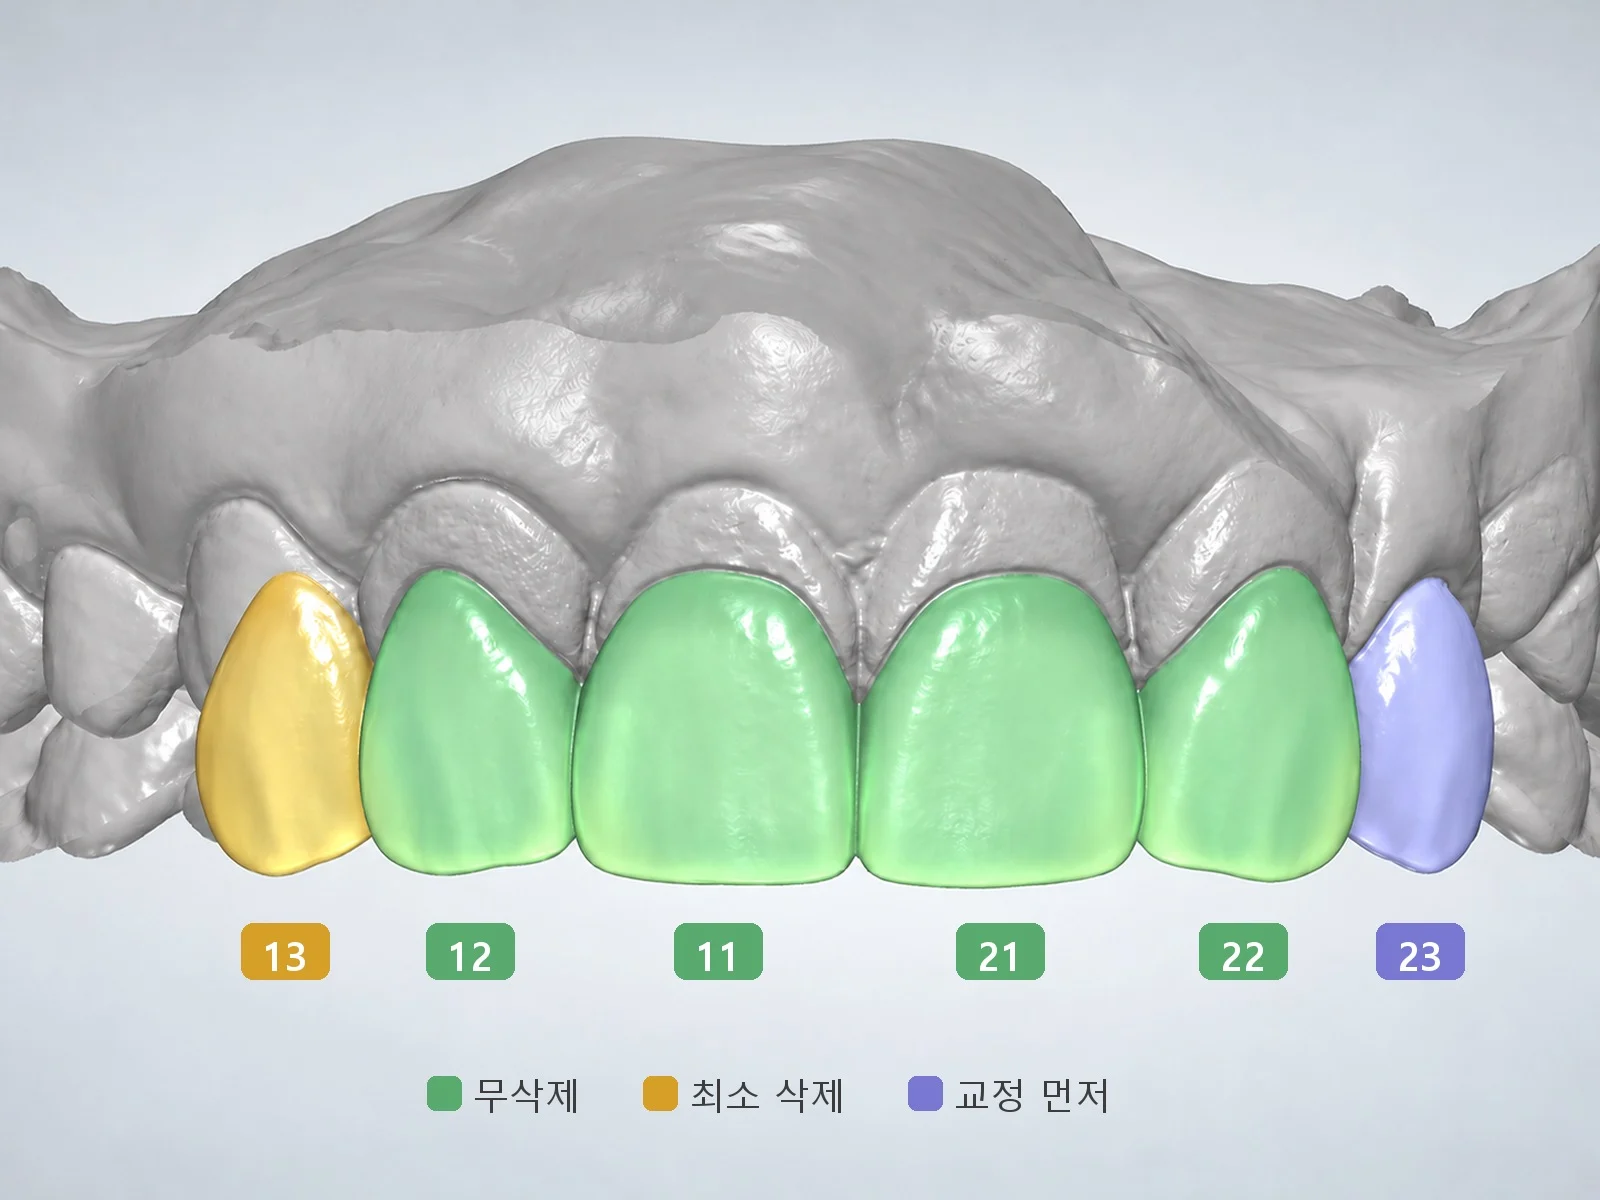
Example of a tooth-by-tooth explanation. We show you, with tooth numbers, which teeth are left unshaped and how much the others are shaped.
STEP 05
Each tooth is assigned no-prep, minimal prep, or orthodontics first
We explain the results with tooth numbers. If a tooth is difficult for no-prep, we show you the reason (position, color, or bite) and also tell you whether orthodontics could change it.
Why we do thisAiming for 'all no-prep' can make some teeth look bulky or differ in color. Knowing from the start that each tooth may need a different approach makes the result less surprising.
* Clinical photos were published with the patients' consent. Side effects such as temporary pain or discomfort may occur depending on the person.
04°
No-prep, minimal prep, and conventional prep compared
No-prep
Minimal prep (within enamel)
Conventional prep
Suitable teeth
Small teeth, teeth with gaps, or teeth that sit slightly inward
Teeth in a good position that need a change in color or shape
Very dark teeth or teeth needing a large change in shape
Amount of shaping
None (only surface smoothing)
Roughly 0.2–0.5 mm within enamel
Roughly 0.5–0.7 mm or more
Anesthesia
Usually not needed
Sometimes done without it when shaping is very slight
Local anesthesia in most cases
Thickness
Thicker by the amount added
Close to the original thickness
Close to the original thickness
Ability to hide color
Weak
Moderate
Strong
Gum line
Must be designed so no ledge forms
Easy to finish
Easy to finish
Limits
Difficult for teeth that stick out or are dark
Cannot be reversed
If reduction becomes large, a crown is considered
Reduction amounts are general ranges. In practice, we work backward from the finished shape and decide for each tooth.
05°
For these people, another treatment comes first, or treatment is not needed
Good for you if
Your front teeth are small or have gaps between them
The edges of your front teeth have worn down and become shorter
Your teeth are in a good position and only slightly yellow
Other treatment comes first
Front teeth that stick out or overlap: partial orthodontics assessment first
Very dark teeth: whitening first, or consider minimal prep
Gum inflammation: gum treatment first
Severe teeth grinding or clenching: check the bite and a night guard first
You may not need it now
There is only one very small gap, and resin is enough
Your only concern is color, and whitening gives the brightness you want
06°
Self-check
The more items apply to you, the more likely no-prep is possible. An accurate decision is made after checking position and color.
07°
Side effects and limits
Please read
· Because thickness is added, your lips may feel unusual against your teeth at first.
· Because they are thin, they can chip. Avoid biting through hard foods with your front teeth.
· Staining at the gum-side edge or gum inflammation can occur, so regular check-ups are needed.
· Your original tooth color may show through, so your teeth may not become as bright as you want.
· We do not recommend no-prep veneers for unsuitable teeth just because they involve 'no reduction.'
FAQ
FAQ
Do no-prep veneers really involve no tooth reduction at all?
Teeth with room to add to are bonded without reduction. However, a very small adjustment to smooth the bonding surface may be needed, and it is common for one person to have some teeth done with no prep and others with minimal prep.
We check whether a tooth has room to add to, such as a small tooth, a gap, or a tooth that sits inward, and preview it in 3D before deciding on no-prep, so it does not look bulky. With a 3D design, we see in advance how much thickness will be added and check that the teeth do not look like they stick out from the side.
If no-prep veneers are removed later, will my teeth go back to how they were?
If the tooth was not reduced, your original tooth remains after the veneer is removed.
Do no-prep veneers come off more easily?
Bonding to unreduced enamel generally gives good bond strength. Whether a veneer comes off or breaks depends more on your bite and habits such as teeth grinding, so we check these risk factors first.
Can no-prep veneers cover dark tooth color?
If the color is very dark, thin no-prep ceramic has difficulty hiding it. We recommend brightening the base color first with whitening, or using minimal prep on just those teeth to make room for thicker ceramic.
Can I have no-prep veneers if my front teeth stick out a little?
Adding to front teeth that already stick out makes them look even more forward. In some cases, moving them inward first with front-teeth partial orthodontics makes no-prep or minimal-prep veneers possible, so our orthodontist compares the options with you, including how long each takes.
Can One-day CERANATE also be done with no prep?
One-day CERANATE is decided by the same criteria. Whether to reduce depends on your current tooth alignment and the target design. When teeth are evenly aligned or the teeth themselves are small, it can often be done with no prep.
Another clinic said I could have no-prep veneers. What if your consultation says my teeth need reduction?
We show you on the exam images whether position, color, or bite is the reason the teeth need shaping. We also tell you whether orthodontics could remove that reason, and you can decide after seeing the comparison.
Questions from patients who travel to Seoul for treatment.
How much does CERANATE cost?
CERANATE is KRW 550,000–770,000 per tooth including VAT, depending on the material and fabrication method. International and Korean patients pay the same fees. During promotional events, the same discounted price applies to everyone; ask us on WhatsApp about current events. The tax refund for foreign medical tourists has ended in Korea, so no refund applies. The number of teeth is decided at diagnosis, so we tell you the total after the examination. See our fee schedule.
How many visits do I need, and how long should I stay in Korea?
CERANATE One-Day takes 2 visits over 1–2 days. The Art and The Petit take 2 visits over about 1 week. If orthodontics, whitening or gum treatment comes first, that time is added. We suggest leaving 1–2 spare days after the final bonding before your flight. The check-up about 2 weeks after bonding can be done by photo on WhatsApp, and we see you in person on your next visit to Korea.
Can I have my consultation in English?
Yes. The doctor in charge of your treatment consults with you directly in English. Before you travel, you can send photos of your teeth on WhatsApp or by email. An accurate diagnosis is made after we examine you in person.
What if a veneer chips or comes off after I go home?
Send us a photo on WhatsApp first. If a veneer comes off, keep it. We check it and tell you what to do. Repairing or remaking a veneer needs a visit. How breakage is handled, and what it costs, depends on the CERANATE option, and we explain this before treatment.
Results, the number of visits and schedules vary from person to person. More questions: Visiting from abroad.


 Before · Feb 2026
 After · Mar 2026
 Before · May 2026
 2-week check-up after treatment · May 2026
 Before orthodontics · Apr 2025
 After orthodontics, before veneers · Apr 2026
 After veneers · Apr 2026
 Cephalogram
 Gum line
 Front thickness
 Side view
 ① Shade comparison
 ② Show-through check
 Decision for each tooth